

Why dwell on fuel?
No fuel = No coffee. It’s as simple as that. If you inherited a terrific Butane stove, say, with an amazing BTU output but now can’t find the quirky canisters needed to fire it up…No Coffee for You! So, as I noted in Part 1, “Stoves for SHTF,” my highest recommendation for the Total-Camp-Stove-Novice is an Alcohol-burner. This post will illustrate why. (I forgot to link to my inexpensive “Alocs” in the first part; it performed just as well as the Trangia®, and many knockoffs come with a tiny pot-stand.)
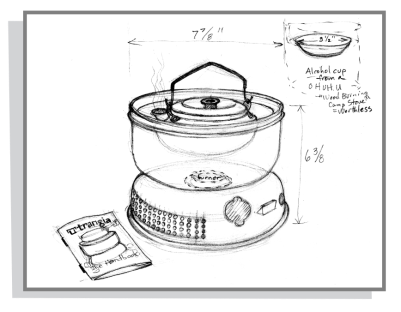
I did note in Part 1, that if you have little or no cookware and/or are moving into the “minimalist lifestyle,” consider purchasing your burner as part of a full Trangia® kit (which nests compactly for backpacking into a small mixing-bowl sized package). It’s kind of expensive, so keep reading and see the awesome alternative: a Brick-Pot-Support configuration that you can put together, possibly for free!
What’s in this post
I’ll share:
- SOOT-comparison contest between KleanStrip® (the classic alcohol fuel) and the three “unorthodox” alcohols I’ll introduce you to for SHTF because soot matters;
- SOOT-minimizing;
- TIMED-BURN-test (of these four “alcohol fuels”);
- Failed FUEL-vs-FUEL challenge, wherein traditional KleanStrip® went head to head with bad-boy Everclear® (I used my brand new classic/large Trangia®25 kit) and, during which…I got a BIG SURPRISE;
- The AWESOME BRICK Pot-Support I built after that “surprise;”
- (How I) Try not to get BURNED.
1) Soot Comparison

From left to right: 70% Isopropyl Alcohol; 91%; Everclear 190 Proof (consumable) Alcohol; KleanStrip denatured Alcohol stove-fuel. In front of each different fuel is the heavyweight aluminum foil which I wrapped a 5.5” tile with. The flames from 1 Tbl. of fuel were directly contacting the foil, as it sat about 1.5” above the small fuel cup used in the test.
It was in the mid-to-high 40’s while I did this test the morning of 22 Nov 2021. The 70% alcohol was fairly reluctant to light. I needed to use a second match. The other three lit easily with one match. (NOTE: See my Cooking Set-Up. Notice the “votive candle?” I like to keep one burning nearby in the event I need to relight a blow-out or if I put a stove out too soon and need to fire it up for something more. This way I can RE-USE saved matches that are only slightly burned.)
2) Soot Minimizing

Two simple solutions…
1) Use heavy duty foil on your pots and pans! You’ll note that I covered the little 6.5” cast-iron sauté pan with it (dull side out!).
2) Place something you’ll “never clean” between the alcohol-flame and your pots and pans. I’ve saved a very large disposable pie pan from Thanksgiving and will give it a try next time I get the burner out, but I envision no reason it won’t work. (The soot it’ll acquire will quickly eliminate any reflectivity that might have slowed heating times.)
3) Timed-Burns
(I have no way to determine energy-output of each fuel ounce for ounce, other than How-Fast-to-the-Boil. Go to Part 1 to see the chart comparing KleanStrip® alcohol vs. the my other stoves’ fuels.)
Sure, alcohol camping-burners are cute, like all petite things, but suddenly I got to thinking all doom & gloomly…Hm-m-m…when normal fuel is nowhere to be found, would a booze like Everclear® burn well enough for cooking?
For fun I decided to discover how long 1 Tablespoon (i.e. ½ oz.) of each of the four fuels would burn under identical conditions. The second Burn-Time column is taking a Trangia suggestion: to add “up to 15% water.” (Each measure was placed into a cooled-down “alcohol cup” set-up on repurposed parts of the same “twig stove” the little cup came with. No additional shelter was configured around it.) Here are the results.

(At the time I first wondered about all this, I didn’t even have any Everclear. For sure I wasn’t gonna light-up my precious lemon Grey Goose® or my go-to bourbon, Buffalo Trace® as a stand-in! NOTE: Everclear’s nowhere as cheap as “rubbing alcohol,” for sure. It’s kind of expensive comparatively speaking, but since it does well AND serves other purposes (kills bacteria, makes “fruit-punch-ier”), I’d consider putting back a bottle or two as a last-ditch fuel. It was “clear” afterwards, that for The-End-Of-The-World-As-We-Know-It (TEOTWAWKI), traders of booze will be as busy as those dealing in “bullets, beans, and bandages!”)
4) Failure meant a Big-Surprise
…and not in a good way. It was kind of depressing: I was all excited to try out the new Trangia25 windscreen-plus-burner combo I’d just bought. I was 1000% certain that configuration would heat 8 oz. of water in the Trangia teakettle way better than the burner+folding windscreen did during my Deep-Freeze battle of the stoves – no matter the alcohol I picked. After all the original alcohol-burner-times were also working against super-cold weather. Well, as it turned out the kit didn’t do better (and I’m not sure why). I’m not going to bother sharing the results here, but I will try try again once I get this post up.
Worse than the kit’s poor performance times, though, was the fact that I could hardly keep the burner lit! (I did not stop the timer for re-lights…) Every time I’d set the teakettle over the flame – on the cook-kit’s built-in pot-clips – I’d quit hearing the burner’s distinctive flame-sound…so I’d lift it and…yup, no flame. FYI as you look into the burner it’s easy to see if there is fuel remaining. (NOTE: on another occasion I observed that once the visible-alcohol burns off the interior-bottom the flames continue for half-a-minute or so, proving there is a tiny bit of fuel up inside the double-wall-channel that is fabricated into these types of burners.)
I was crestfallen that day (and, I admit, a little angry) but I couldn’t give up. I knew there had to be a way. Perhaps a secondary shelter around the Trangia kit? Hence the development of my…
5) Awesome Brick Pot-Support

I put this together that same morning. It worked so well with JUST the alcohol-burner sitting atop its pre-warmer that I have yet to go back to try the full-kit with it. My first configuration was only three bricks and I quickly decided to try cooking on it.
Trangia says, “about 25 minutes.” I say, “Hold my martini!”

I used the 91% alcohol to try out the Trangia pre-warmer, which, BTW, is too loose on my Alocs knockoff. I filled the burner with Trangia’s stated “2/3’s maximum” (about 100ml). You see in the soot-comparison photo above, the 91% creates a pitch-black residue. (Air temp was 58°F at 12:58 pm when I lit the burner. It did NOT go out.)
 Within a mere 22 minutes of burn-time I’d: boiled 8 oz. of water for coffee; pre-heated the cast-iron pan; fried one egg; and finished eating it! Impressive because it was so breezy. In fact, the burner’s flames were whipping out the holes in the pot-stand of three bricks. I quickly set other bricks around outside the original three in order to wedge tiles between the two sets, more or less blocking the holes.
(NOTE: there seemed to be plenty of fuel left, so I put the lid on tight – normally I would dispose of leftovers – left it in the brick pot-stand, and burned it dry the following day.) I got another 20 minutes before the flame went out, for a total of 42 minutes on one fill. Trangia’s stated time for a full stove is “about 25 minutes!”
BONUS: Awesome Brick SVEA-Stove Wind-Break!

One morning I was late making my coffee so decided to try the white-gas SVEA® again. It had done poorly in the breezy conditions back in February – needing to be re-lit – so I wondered if the brick shelter would make it easier. After stacking two levels of bricks I added the pre-warming fuel. (NOTE: Hand-sanitizer in a pump container works great for this. Just pump enough to fill the entire “divot” at the base of the SVEA burner, see diagram. I found that the pre-warming gel will burn about 2 minutes when filled to the max. It may still be burning once the stove is going, but that’s no problem…better than not having put enough there and having to start over!)
After three mornings in a row firing up the SVEA, I gotta say the nostalgia of its putt-putt-puttering burner has me crushing on it all over again! On one of these recent occasions I made 24 oz. of coffee in a stainless-steel percolator in just under 11 minutes. (5:50 minutes to first-perk! I give kudos to the taller brick wind-break for that great performance.)
6) Don’t Get Burned

Playing with fire is fun, but remember to be extra careful around camp-stove-fueled open-flames:
- 1) make yourself Harder-to-Set-On-Fire by first tying back long hair AND by wearing a top-layer of natural-fibers (in winter also skip the fuzzy dangling scarves);
- 2) when lighting your burner, use a small Hemostat Clamp to give your match the extra “reach” to the pre-warmer (and especially the hard to get-to SVEA pre-warmer if you choose to go with that stove); and lastly,
- 3) have a heatproof area set-up adjacent to the stove (tiles are perfect) and some potholders nearby for hot cookware!
Final Suggestions
If an alcohol-burner has no appeal for you after considering this post, my #2-Stove suggestion based on 1) ease-of-operation and 2) cost would be the “Single-burner Propane Stove.” These sit atop (screw onto, actually) a 1 lb. propane canister, while the bottom of the canister snugs-into a stable base. For optimum fuel-efficiency, I’m convinced you ought to configure wind-protection for it or any stove.)
I hope this has inspired you to try an alcohol-burner as an inexpensive entry into camping stoves. But whichever stove you choose, try it right away, say, for morning coffee on your day off? The practice will give you confidence in setting it up, getting it going, and keeping it going in a less stressful environment. Wait…you’re stressed before that first cup? Then have your first one indoors, your regular way 🙂 But out at your new alcohol-burner don’t forget to set-up that votive candle nearby to make (the inevitable) relighting easier.
Happy Camp (or SHTF)-Cooking.


